http://support.f5.com/kb/en-us/products/big-ip_gtm/manuals/product/gtm_config_10_2/gtm_probing.html
Monday, November 25, 2013
Monday, October 28, 2013
About MAC masquerade addresses
About MAC masquerade addresses
http://support.f5.com/kb/en-us/products/big-ip_ltm/manuals/product/bigip-device-service-clustering-11-4-0/8.html
A primary purpose of a MAC masquerade address is to minimize ARP communications or dropped packets as a result of a failover event. A MAC masquerade address ensures that any traffic destined for the relevant traffic group reaches an available device after failover has occurred, because the MAC masquerade address floats to the available device along with the traffic group. Without a MAC masquerade address, on failover the sending host must relearn the MAC address for the newly-active device, either by sending an ARP request for the IP address for the traffic or by relying on the gratuitous ARP from the newly-active device to refresh its stale ARP entry.
The assignment of a MAC masquerade address to a traffic group is optional. Also, there is no requirement for a MAC masquerade address to reside in the same MAC address space as that of the BIG-IP device.
Tuesday, October 15, 2013
Monitors on F5
https://devcentral.f5.com/articles/monitoring-tcp-applications-01
https://support.f5.com/kb/en-us/products/big-ip_ltm/manuals/product/bigip9_3config/BIG_IP_LTM_9_3_Config_Guide-13-1.html?sr=1
https://support.f5.com/kb/en-us/products/big-ip_ltm/manuals/product/bigip9_3config/BIG_IP_LTM_9_3_Config_Guide-13-1.html?sr=1
Wednesday, September 25, 2013
Openssl commands
Some Useful Openssl
Commands
http://support.f5.com/kb/en-us/products/big-ip_ltm/manuals/product/bigip9_0cli/BIG_IP9_0XCLIGuide2-5-1.html
Read content of a cert:
Read content of a cert:
openssl x509 -text -in server.crt
Read content of a
CSR:
openssl
req -in server.csr -noout –text
Check a key to see
if a key has a password:
openssl
rsa -in keyfile.key [if
it prompts for a password, the key was created with a password]
Check if a cert
and key match:
The md5sum from both
the below commands should be same for them to be a pair
openssl
x500 -noout -modulus -in server.crt | openssl md5
openssl
rsa -noout -modulus -in keyfile.key | openssl md5
Creating a self
signed ssl certificates:
Create a private key:
openssl
genrsa -des3 -out server.key 2048 [we can chose to use a password or
not while creating key,
if password is not required, just click enter and don’t
input any password]
Generating a certificate signing request (CSR):
openssl
req -new -key server.key -out server.csr
It prompts for the
following:
Country Name (2 letter code) [GB]:
State or Province Name (full name) [Berkshire]:
Locality Name (eg, city) [Newbury]:
Organization Name (eg, company) [My Company Ltd]:
Organizational Unit Name (eg, section) []:
Common Name (eg, application’s name or your server's
hostname) []:
Email Address []:
Please enter the following 'extra' attributes
to be sent with your certificate request
A challenge password []:
An optional company name []:
Creating the
certificate:
openssl
x509 -req -days <no.of days> -in server.csr -signkey server.key -out
server.crt
Example: If a certificate valid for one year is needed
the relevant command would be as under:
openssl x509 -req -days 365
-in server.csr -signkey server.key -out server.crt
Testing an SSL connection with
openssl:
If there is a VIP or a server ip
configured on a port with ssl certifcates attached to it, telnet cannot be used
to test content on it (for checking ECV monitors) like normal http VIPs/server
IPs. In these cases openssl can be used, thus:
openssl
s_client –connect <ip>:<port>
This will open an SSL connection to
the client reading the certificate in it. At the prompt we can input the GET
string, HOST string etc., to test the content on the VIP/server ip.
--------------------------------------------------------------------------------------------------------------------------
Getting the certificate dates
echo | openssl s_client -connect remotedeposit-cit2.bankofamerica.com:443 2>/dev/null | openssl x509 -noout -dates
--------------------------------------------------------------------------------------------------------------------------
Getting the certificate dates
echo | openssl s_client -connect remotedeposit-cit2.bankofamerica.com:443 2>/dev/null | openssl x509 -noout -dates
or
curl -kv https://abc.example.com 2>&1 | grep expire
curl -kv https://abc.example.com 2>&1 | grep expire
GUI | https is giving error on F5
you can try restarting the httpd and tomcat services by running the following commands:
# bigstart stop httpd
# bigstart restart tomcat
# bigstart start httpd
# bigstart stop httpd
# bigstart restart tomcat
# bigstart start httpd
Friday, September 13, 2013
F5 imp commands
Frequently used Command in day to day operation : V 9.X and 10.X
top - To check CPU states , Memory , Swap
df - to check disk utilization
du –sH * - to check the size of files in particular directory. E.g. give cd /var > then give du –sH * It will show the disk size of all the files inside var.
b interface show – to get all interface up/down status
b vlan show – to check vlan member , related trunk , interface and also more important traffic on particular interface in (pkts,bits,errs) format.
b fo show – to check failover active time
ifconfig – to check interface configuration. Like Ethernet port , IP, subnet mask.
b mgmt route – to get the gateway of the device
b mgmt show – management IP and netmask.
route – to check routing details
netstat –nr – similar like route with some more details.
tar zcvf /shared/tmp/logs_C1424418.tgz /var/log/* -- To tar the logs and send it to f5
Saturday, September 7, 2013
Transaction | changes via Transaction
It takes a high load on the CPU if you do changes via command like directly , rather than using transaction.
As per F5 recommendation , we should be using Transaction which gives less load on CPU.
[root@testbox:Active] config #tmsh
root@testbox(Active)(/Common)(tmos)#cli
root@testbox(Active)(/Common)(tmos.cli)# create transaction
[batch mode]root@testbox(Active)(/Common)(tmos.cli)#/gtm
[batch mode]root@testbox(Active)(/Common)(tmos.gtm)#
/////give commands///
(tmos.cli)# list transaction
(tmos.cli)# submit transaction
Tuesday, September 3, 2013
Egress Vlan
http://www.ibmsystemsmag.com/aix/tipstechniques/applicationdevelopment/Understanding-802-1q-VLANs/
====================================================================
VLANs (short for virtual LANs) are used to divide networks into smaller, more manageable chunks. This helps to reduce the size of the broadcast domain and helps with security through isolation. Essentially, there are two types of VLAN specifications for Ethernet:
· Port-based VLAN. A defined VLAN based on the port number of the switch. This is easy to configure but often limited to one single switch.
· 802.1q Tag VLAN. In 802.1q, the VLAN information is written into the Ethernet packet itself. Each packet carries a VLAN ID, called a tag. This allows VLANs to be configured across multiple switches. Note that it’s possible for VLAN tags to be stripped by H/W and/or S/W.
When using 802.1q, four bytes are added to the Ethernet frame, of which 12 bits are used for the VLAN ID. Theoretically, there can be up to 4096 VLANs per network.
An Ethernet packet that contains a VLAN ID is called a tagged packet. Conversely, an Ethernet packet with no VLAN ID is called an untagged packet. Typically all packets leave untagged, unless tagged by the adapter prior to arriving at the switch port.
Egress and Ingress Rules
Egress rules determine which frames can be transmitted out of a port, based on the Egress List of the VLAN associated with it. Each VLAN has an Egress List that specifies the ports out of which frames can be forwarded, and specifies whether the frames will be transmitted as tagged or untagged frames.
Ingress rules are a means of filtering out undesired traffic on a port. When Ingress Filtering is enabled, a port determines if a frame can be processed based on whether the port is on the Egress List of the VLAN associated with the frame.
When an untagged packet arrives at the switch port, the switch will write a VLAN ID into the header of the frame according to the PVID (port VLAN) port definition. Typically, most switches today have all ports are set to a default PVID of 1. . When a tagged frame arrives at a switch port the tag is respected.
A VID defines the member of a port group. A packet can only travel inside a member port when the member port is part of a VID port group.
Monday, September 2, 2013
checking the sync group devices for GTM
1. you can dig your wideip url / alias from the GTM and find the NS servers .
or if its external , you can go to windows command prompt :
go to nslookup
set type=ns
then give your alias or wideip name
2. Login to GTM via GUI -- go to System -- Device certificate -- Trusted device certificate , all the GTM mentioned there will be in sync .
3. Try to grep it from log
less /var/log/gtm | grep -i sync
CPU | Memory | TMM
for version 9.X and 10.X
bigpipe global is the command to check , how much memory is captured by TMM
~ # bigpipe global | grep TMM
+-> TMM traffic --
| TMM cycles (total, idle, sleep) = (0, 0, 0)
It's possible that you may see high CPU while checking with top command , but it the memory may be occupied by TMM and mostly will be in idle state , which is normal.
= = = = = = = = = = = = = = = = = = = = = = = = = = = = == = = =
Sunday, September 1, 2013
GTM - virtual server for wideip having issue
1. Turn on debug logs using the following bigpipe commands:
b db GTM.DebugProbeLogging enable
b db GTM.QueryLogging enable
b db Log.Big3d.Level debug
2. Copy/Paste the following tcpdump command:
tcpdump -ni 0.0 -s0 port 53 -w /var/tmp/capture_dns_query.dmp
3. While the tcpdump is running, query the WideIP from a different device than the GTM making sure you are using the listener address of the GTM. For example:
dig +short example.wideip.domain.com @<listener-ip>
Perform the query several times
4. Control-C from the tcpdump
5. Turn off debug logs using the following bigpipe commands:
b db GTM.DebugProbeLogging disable
b db GTM.QueryLogging disable
b db Log.Big3d.Level notice
6. Create a tar file of /var/log/gtm
tar czf /var/tmp/C1415078_gtm_logs.tgz /var/log/gtm
if you want to share it with someone.
7. so now you need to review two things
one is the capture
second the logs
Saturday, August 31, 2013
TCP dump
=======
TCPDUMP
=======
https://devcentral.f5.com/wiki/advdesignconfig.troubleshootingltmmonitors.ashx
We can use tcpdump to see what response is being sent and received to and from the pool member. We use some specific flags to configure the output:
tcpdump -nni 0.0 -X -s0 host 10.x.x.1 and port 80 and host 10.x.x.2 -w test.pcap
To filter the traffic, we use the pool member IP address, port and the non-floating self IP that the monitor requests will be sent from.
===========================================================
To take source , VIP and pools into account
If
============================
Source : 1.1.1.1 port 1111
VIP: 2.2.2.2
Pool Members: 3.3.3.3 and 4.4.4.4 port 12345
Then
=============================
tcpdump -nni 0.0:nnn -s0 -C 10 -W 100 --w /var/tmp/tcpdump.pcap '( host 1.1.1.1 or host 2.2.2.2 and port 1111) or ((host 3.3.3.3 or host 4.4.4.4 ) and port 12345)' -vvv
TCPDUMP
=======
https://devcentral.f5.com/wiki/advdesignconfig.troubleshootingltmmonitors.ashx
We can use tcpdump to see what response is being sent and received to and from the pool member. We use some specific flags to configure the output:
- -nn - don't attempt to convert IP addresses to hostnames or ports to service names
- -X - print hex and ascii output
- -s0 - don't limit the snap length (packet size) captured
tcpdump -nni 0.0 -X -s0 host 10.x.x.1 and port 80 and host 10.x.x.2 -w test.pcap
To filter the traffic, we use the pool member IP address, port and the non-floating self IP that the monitor requests will be sent from.
===========================================================
To take source , VIP and pools into account
If
============================
Source : 1.1.1.1 port 1111
VIP: 2.2.2.2
Pool Members: 3.3.3.3 and 4.4.4.4 port 12345
Then
=============================
tcpdump -nni 0.0:nnn -s0 -C 10 -W 100 --w /var/tmp/tcpdump.pcap '( host 1.1.1.1 or host 2.2.2.2 and port 1111) or ((host 3.3.3.3 or host 4.4.4.4 ) and port 12345)' -vvv
Friday, August 30, 2013
Thursday, August 29, 2013
GTM good links
http://support.f5.com/kb/en-us/products/big-ip_gtm/manuals/product/gtm-concepts-11-3-0.html
IQUERY good links
support.f5.com/kb/en-us/solutions/public/0000/100/sol159.html
http://support.f5.com/kb/en-us/products/big-ip_gtm/manuals/product/gtm-concepts-11-3-0/2.html
http://support.f5.com/kb/en-us/products/big-ip_gtm/manuals/product/gtm-concepts-11-3-0/2.html
Friday, August 23, 2013
SSL well explined by F5
SSL
Links from F5
https://devcentral.f5.com/articles/ssl-profiles-part-1
Links suggested by F5
http://dimacs.rutgers.edu/Workshops/ComputerSecurity/slides/d4_tls_ssl.pdf
http://www.ietf.org/rfc/rfc2246.txt
SSL external links
http://www.moserware.com/2009/06/first-few-milliseconds-of-https.html
SSL profile explained below by F5
http://support.f5.com/kb/en-us/solutions/public/10000/100/sol10167.html
Wednesday, August 21, 2013
Troubleshooting BIG-IP GTM synchronization and iQuery connections (11.x)
http://support.f5.com/kb/en-us/solutions/public/13000/600/sol13690.html
Thursday, August 15, 2013
Wednesday, August 14, 2013
GTM synchronization group requirements - notes
http://support.f5.com/kb/en-us/solutions/public/13000/700/sol13734.html
Summary
A BIG-IP GTM synchronization group is a collection of multiple BIG-IP GTM systems that synchronize BIG-IP GTM configuration settings and metrics information. You must meet several minimum requirements for BIG-IP GTM synchronization group members to communicate and synchronize properly.
Description
For the BIG-IP GTM synchronization group members to properly synchronize their configuration, you must verify that the following requirements are in place:
* The BIG-IP GTM synchronization group members must be running the same software version
A BIG-IP GTM device should be running the same software version as other members in the synchronization group; BIG-IP GTM devices running different software versions will not be able to communicate and properly synchronize GTM configuration and zone files. For information about displaying the software version, refer to SOL8759: Displaying the BIG-IP software version.
* The synchronization parameters must be properly defined on all members
Synchronization must be enabled and each device must have the same synchronization group name. You can define the synchronization parameters by navigating to System > Configuration > Device > GTM > General.
* NTP must be configured on each device Before you can synchronize BIG-IP GTM systems, you must define the Network Time Protocol (NTP) servers for all synchronization group members. Configuring NTP servers ensures that each BIG-IP GTM synchronization group member is referencing the same time when verifying the configuration data that needs to be synchronized. You can configure NTP by navigating to System > Configuration > Device > NTP.
* Port Lockdown must be set properly for the relevant self IP addresses
Port lockdown is a security feature that specifies the protocols and services from which a self IP address can accept traffic. F5 recommends using the Allow Default option for self IP addresses that are used for synchronization and other critical redundant pair intercommunications. You can configure port lockdown by navigating to Network > Self IPs.
* TCP port 4353 must be allowed between devices BIG-IP GTM synchronization group members use TCP port 4353 to communicate. You must verify that port 4353 is allowed between BIG-IP GTM devices.
* Compatible big3d versions must be installed on synchronization group members
The big3d process runs on BIG-IP systems and collects performance information on behalf of the BIG-IP GTM system. For metrics collection to work properly, synchronization group members must run the same version of the big3d process. For more information about verifying big3d version information, refer to SOL13703: Overview of big3d version management.
* A valid device certificate must be installed on all members
The device certificate is used by the F5 system to identify itself to a requesting F5 client system. The default device certificate, /config/httpd/conf/ssl.crt/server.crt, must be installed on each sync group member. You can verify the certificate validity by navigating to System > Device Certificates.
Monday, July 22, 2013
SNAT
Collection from :http://support.f5.com/kb/en-us/solutions/public/7000/800/sol7820.html
Overview
A SNAT is an object that maps the source client IP address in a request to a translation address defined on the BIG-IP device. When the BIG-IP system receives a request from a client, and if the client IP address in the request is defined in the origin address list for the SNAT, the BIG-IP system translates the source IP address of the incoming packet to the SNAT address.
A SNAT can be used by itself to pass traffic that is not destined for a virtual server. For example, you can use a SNAT object to pass certain traffic (such as DNS requests) from an internal network to an external network where your DNS server resides. A SNAT can also be used in conjunction with a virtual server to translate the source IP address of an incoming packet (with no SNAT configured, no source address translation takes place, and destination address translation takes place as separately configured in the Virtual Server properties). You can also use a SNAT to ensure that response traffic is returned through the BIG-IP system without requiring other outbound non-load balanced traffic to also route through the BIG-IP system, and without requiring any changes in the router or server's configuration. SNAT is also a critical component in one-armed configurations, preventing the server from responding directly to the client.
A SNAT works in the following manner:
The BIG-IP system receives a request from a client and verifies whether that source IP address is defined in the origin address list for the SNAT.
If the client's IP address is defined in the origin address list for the SNAT, the BIG-IP system translates the source IP address to the translation address defined in the SNAT.
The BIG-IP system then sends the client request to the pool member or other destination.
Types of SNATs
Standard SNATs and intelligent SNATs are illustrated in the following section:
Standard SNATs
The following three examples illustrate three types of standard SNATs:
A SNAT in which you specify a specific translation address
One way to create a SNAT is to directly map one or more original IP address to a specific translation address that you choose. For example, the following SNAT configuration translates the address of connections that originate from the address 10.10.10.1 to the translation address 172.16.0.1:
snat test_snat {
translation 172.16.0.1
origins 10.10.10.1
}
Automap SNAT
Of the available SNAT options, SNAT automap is often preferred since it is simple to configure and maintain, and helps conserve IP addresses by using the BIG-IP system's existing self IP addresses.
When the BIG-IP system processes connections from the origin IP addresses matching a SNAT automap definition, it chooses a translation address from the available self IP addresses. Floating self IP addresses on the egress VLAN are preferred to support seamless failover. If multiple floating self IP addresses are configured on the VLAN, the BIG-IP system translates the address of client connections by alternating through a pool of all floating self IPs on the VLAN.
Note: The SNAT automap feature may not use the intended translation address if a floating self IP is not available on the egress VLAN, or the floating self IP address was originally a static self IP address. For more information, refer toSOL7336: The SNAT automap feature may use an unintended self IP address.
For example, the following SNAT configuration translates the address of connections that originate from the address 10.10.10.1 to one of the system's self IP addresses:
snat test_snat {
automap
origins 10.10.10.1
}
SNAT pools
A SNAT pool represents a pool of translation addresses that you configure on the BIG-IP system. The original IP address is then mapped to the entire translation pool, called a SNAT pool. For example, the following SNAT pool configuration contains the translation addresses 172.16.0.1 and 172.16.0.2:
snatpool my_snatpool {
members {
172.16.0.1
172.16.0.2
}
}
After you create the SNAT pool you must associate it with a SNAT object. For example, the following SNAT configuration translates the address of connections that originate from the address 10.10.10.1 to one of the IP addresses in the SNAT pool:
snat test_snatpool {
snatpool my_snatpool
origins 10.10.10.1
}
Note: The BIG-IP system load balances SNAT pool connections between members using the least connections algorithm.
====================================================================
****************************************************************************
http://support.f5.com/kb/en-us/solutions/public/7000/300/sol7336.html
The SNAT Automap feature selects a translation address from the available self IP address in the following order of preference:
Floating self IP addresses on the egress VLAN
Floating self IP addresses on different VLANs
Non-floating self IP addresses on the egress VLAN
Non-floating self IP addresses on different VLANs
The selection of a floating self IP as translation address on a VLAN other than the egress VLAN is intended to avoid disruption in an HA failover scenario. However, depending on the network routing configuration, selection of a self IP other than the egress VLAN may cause traffic disruption. F5 recommends that you ensure that you have configured floating self IP addresses on all VLANs from which you expect SNAT traffic to egress. Alternatively, you can mitigate the issue by using a SNAT pool with an IP address on the egress subnet VLAN as a member for the SNAT pool.
Important: SNAT Automap does not use non-floating self IP addresses that have been re-configured as floating self IP addresses. To convert a non-floating self IP address to become a floating self IP address for use with SNAT Automap, delete the non-floating self IP address first and then re-add the same self IP address as a floating self IP address. To delete the non-floating address from that VLAN, you must configure at least one other non-floating IP address on the associated VLAN.
Monday, May 20, 2013
Booting the BIG-IP system in single-user mode
https://support.f5.com/kb/en-us/solutions/public/4000/100/sol4178.html
 How-To
Original Publication Date: 05/16/2007
Updated Date: 04/24/2013
Original Publication Date: 05/16/2007
Updated Date: 04/24/2013
On certain occasions, it may be necessary to boot
the BIG-IP system into single-user mode to fix operating system issues,
such as filesystem or root password issues.
To boot the BIG-IP system into single-user mode, perform the following procedure:
To boot the BIG-IP system into single-user mode, perform the following procedure:
Note: To perform the following steps, you must be local to the BIG-IP system with a console connection or using a console server.
- Connect a terminal to the BIG-IP serial console port.
- Reboot the BIG-IP system.While booting, the BIG-IP system displays the GRUB menu and counts down before continuing the boot process.
- Before the countdown expires, use the up and down arrow keys to select the appropriate boot image.Note: Alternately, press SHIFT+6 (^) to arrow up, and press the v key to arrow down.
- Press the e key to edit the boot options.
A new GRUB menu screen displays. - Use the up and down arrow keys to select the line that begins with kernel /boot/vmlinuz.Note: Alternately, press SHIFT+6 (^) to arrow up and press the v key to arrow down.
- Press the e key to edit the line.
- Add the word single to the end of the kernel /boot/vmlinuz line, and then press the Enter key.For example:
kernel /boot/vmlinuz singleDepending on the platform, the boot command may instead appear similar to the following example:
kernel (hd1,1) /boot/1/vmlinuz ro root=UUID=f6155ffc-db65-46e9-9ba6-7f842a7d06ee console==tty0 console=ttyS0 19200 panic=1 mem=384M platform = D68 quiet single - The previous menu screen appears, and the system shows the new boot command.
- Press the b key to boot the system using the modified options.
- A prompt displays.
Sunday, February 24, 2013
SSL offloading on F5
Setting up SSL Offloading (Termination) on an F5 Big-IP Load Balancer
Article by Nate HaugMay 9, 2012 - 7:00pm
Hardware-based SSL decryption allows web servers (Apache, nginx, Varnish) to focus on serving content.

In a quick, largely unscientific test, here are two Apache Bench results against a stock Apache install, one with SSL and one without. Just serving up a static text file:
ab -c 100 -n 100 http://localhost/EXAMPLE.txt
Requests per second:    611.21 [#/sec] (mean)
Time per request:       163.609 [ms] (mean)
Time per request:       1.636 [ms] (mean, across all concurrent requests)
Transfer rate:          816.54 [Kbytes/sec] received

ab -c 100 -n 100 https://localhost/EXAMPLE.txt
Requests per second:    48.52 [#/sec] (mean)
Time per request:       2060.857 [ms] (mean)
Time per request:       20.609 [ms] (mean, across all concurrent requests)
Transfer rate:          64.82 [Kbytes/sec] received
Yikes, HTTPS is 12 times slower than HTTP! Not to mention more processor intensive. Comparing against nginx or Varnish, the slowness ratio increases as they serve HTTP traffic even faster. Now there are certainly ways to speed up SSL (using faster cyphers for example), but the fact remains that SSL is expensive. By using hardware level decryption at the load balancer, the web server software (or reverse-proxy software like nginx or Varnish) can focus on serving pages.
Getting Started
For those not familiar with a Big-IP load balancer's administration, most of the configuration is done via a web interface, accessible via the device's IP address.
The Big-IP Administrative interface
Adding SSL Certificates
The first thing you need to do to get SSL termination set up is to install the SSL certificate onto the machine. This is done by navigating to Local Traffic -> SSL Certificates -> Import. You must import the .key and the .crt files obtained from your Certificate Authority (i.e. Verisign, Comodo, etc.) separately with the same "Name" property. So give your certificate and key a name, usually matching the domain name, such as "example-com" or "example-com-wildcard". Upload the .key file as a Key, and the .crt file as a Certficate; both using the same value in the Name field.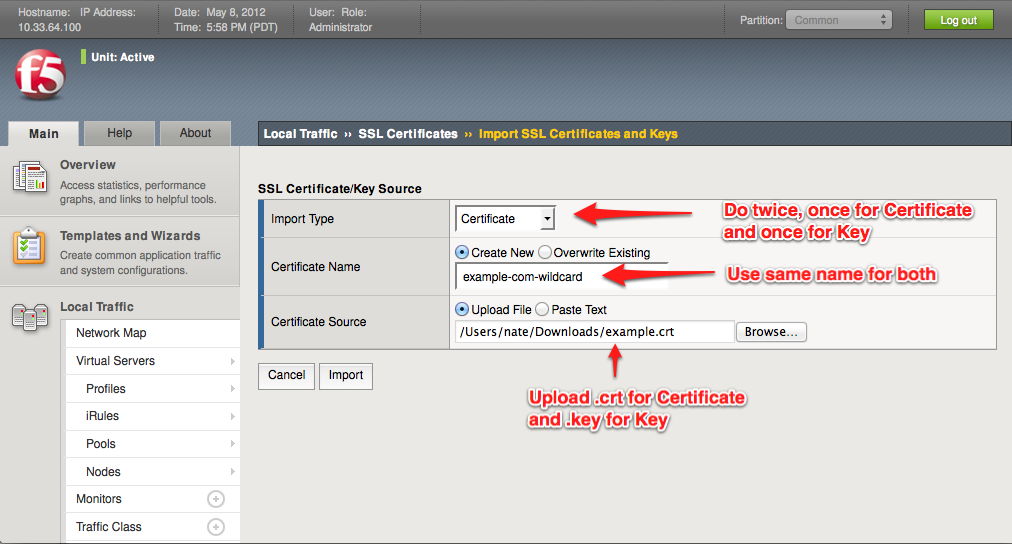
Adding an SSL Certificate

After adding an SSL Certificate
Set up SSL Profile
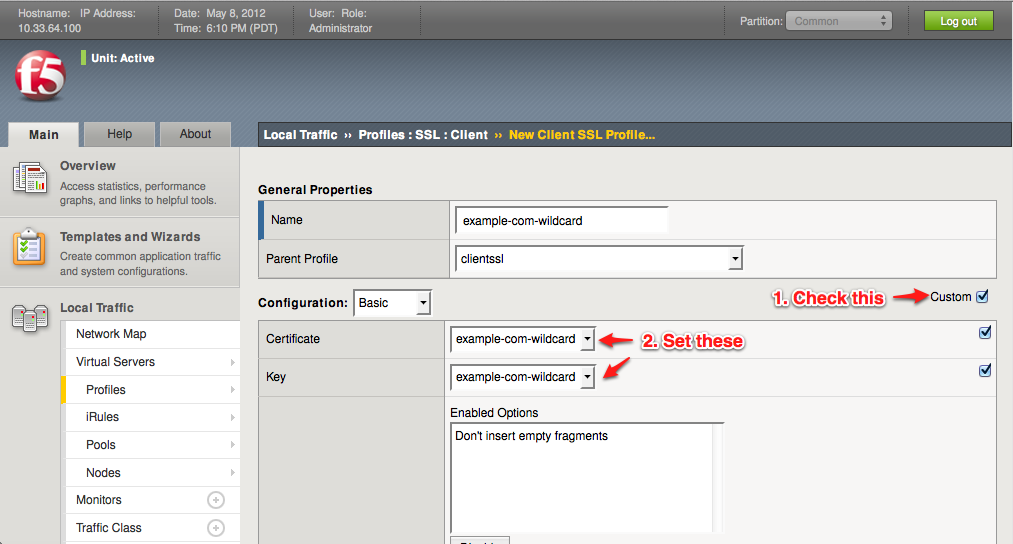
Now that our SSL certificate is uploaded into the load balancer, we need to create an SSL profile that utilizes the certificate. Visit Local Traffic -> Profiles -> SSL -> Client. The term "Client" means traffic between the outside world and the load balancer (conversely "Server" means traffic between your internal servers and the load balancer). Click the "Create..." button to add a new profile.Give your profile a name (it can be the same as the certificate if you like), such as "example-com-wildcard". Leave the Parent profile as the default "clientssl". Check the box for custom options, then select your Certificate and Key that should be used to communicate with your end-user browsers. Leave all the other defaults.
Adding the SSL Profile
Set up the Virtual Server
F5 Load Balancers use a concept of a "Virtual Server" to accept connections at a certain IP address and hostname. I won't go into the details here and assume you already have a Virtual Server for HTTP.If you already have a Virtual Server for HTTPS, edit it. If not, create a new virtual server with these settings:
Name: [same as your HTTP virual server, with "https" added somewhere]
Destination Type: Host
Destination Address: [same as your HTTP virtual server]
Service Port: 443, HTTPS
HTTP Profile: http
SSL Profile (Client): example-com-wildcard
SSL Profile (Server): None
SNAT Pool: [same as your HTTP virtual server]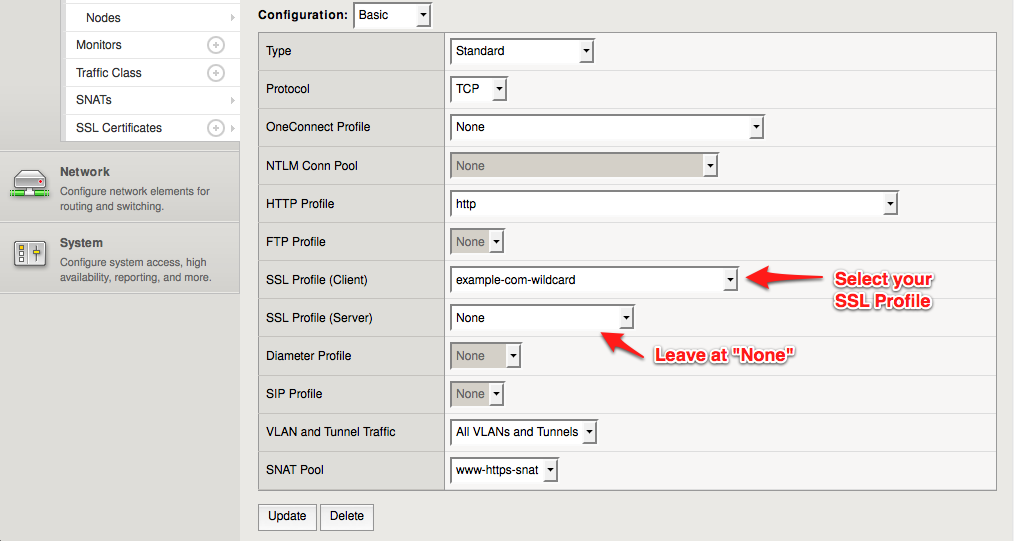
Configuring the HTTPS Virtual Server
Don't skip this: Just because you have SSL termination enabled on this virtual server, you still need to point it at the correct location. If you're editing an existing virtual machine, it is probably currently pointing at a pool of servers on port 443. In the case of Apache, it will throw an error page, refusing to serve insecure HTTP pages over a secure port (443). To fix this (or set it up if this is a new virtual machine), click the "Resources" tab on the new virtual machine.
Under the "Load Balancing" section, select the same "Default Pool" option as you are using for your HTTP virtual machine. This makes it so that both HTTP and traffic that was formerly HTTPS come into the same port on your backend servers.

Setting the Load Balancing Pool to match the HTTP Virtual Server
Identifying HTTPS traffic in your application
The only problem with the above approach to SSL termination is that all traffic getting to your web application is now over HTTP. This is a problem because often times security checks on the page will enforce an HTTPS connection and possibly attempt to redirect the user to HTTPS. In order for the application to avoid redirects like this, we need to inform the web server that the contents of the request were previously encrypted over HTTPS, even though they aren't any more.To do this, it's recommended to set up an iRule that sets a special header. Visit Local Traffic -> iRules -> iRule List. Click the "Create..." button.
In the new iRule, give it a name such as "https-offloaded-header". In the rule contents, use the following code:
##
# Notify the backend servers that this traffic was SSL offloaded by the F5.
##
when HTTP_REQUEST {
  HTTP::header insert "X-Forwarded-Proto" "https";
}
Save the iRule, then head back over to your virtual server under Local Traffic -> Virtual Servers -> Virtual Server List and click on your HTTPS virtual server. Under the "Resources" tab, click "Manage..." in the iRules section.
Move your new iRule from the "Available" list into the "Enabled" list. Moving it to the top of the rule list is also a good idea if you're doing any kind of HTTP/HTTPS redirects on your load balancer as setting headers after doing a redirect can cause pages to be undeliverable. Click "Finished" when done.
Now we're setting a special HTTP header on requests that have been SSL offloaded onto the F5. In your application, check this header in your code. For a PHP application, you may want to use this header to set the $_SERVER['HTTPS'] super-global. And even more specifically for Drupal (since that's what we do here at Lullabot), you would probably include code like this in your settings.php file.
<?phpif (isset($_SERVER['HTTP_X_FORWARDED_PROTO']) && $_SERVER['HTTP_X_FORWARDED_PROTO'] == 'https') {
  $_SERVER['HTTPS'] = 'On';
}?>
Since most PHP applications (including Drupal) check if they're on an HTTPS page by checking this variable, no further changes are necessary to the application.
If you're looking for more information on setting up an F5, Googling usually will not turn up too much because F5 has put the bulk of their documentation on a private site, for which you must first register (for free thankfully), at https://devcentral.f5.com/wiki.
Updated 5/10/2012: Switched iRule to using "X-Forwarded-Proto".
About this 'bot

Nate Haug is an ace-of-trades with wide-variety of Drupal skills. He joined Lullabot in 2006 after lending a hand in Lullabot's MTV UK Drupal project and has since architected several of Drupal's largest projects including the SonyBMG Drupal Multi-site platform and...
more
Thursday, February 14, 2013
myth for version 10.2.x
After saving the configuration directly , somrtime doesn't work. Even if you give >> b save all.
First you need to give >> b load
>> then give >> b save all
Also Devcentral says the same >>
https://devcentral.f5.com/tech-tips/articles/big-ip-and-merge-file-configuration-changes
Direct modification of the configuration file (bigip.conf) was also not an option since it would require a “b load” command to activate any modifications, which is disruptive to active traffic during a reload.
=========================================================
For V 11
run util bigpipe verify load
==================================================================================
Wednesday, February 13, 2013
mcpd process | gtp synchronization & iquery issue.
http://support.f5.com/kb/en-us/solutions/public/13000/600/sol13690.html
Purpose
You should consider using this procedure under the following condition:
A BIG-IP GTM synchronization group is a collection of multiple BIG-IP GTM systems that share and synchronize configuration settings. You must meet several minimum requirements in order for BIG-IP GTM synchronization group members to communicate and synchronize properly. For more information, refer to SOL13734: BIG-IP GTM synchronization group requirements.
Starting in version 11.x, the BIG-IP GTM system uses a commit_id structure, which is linked to an MCP transaction, as a timestamp when updating the configuration for a given device group. The BIG-IP GTM sync group communication flow works as follows:
Symptoms
As a result of synchronization and iquery connection issues, you may encounter the following symptoms:
Purpose
You should consider using this procedure under the following condition:
- You are experiencing BIG-IP GTM synchronization and iQuery connection issues
A BIG-IP GTM synchronization group is a collection of multiple BIG-IP GTM systems that share and synchronize configuration settings. You must meet several minimum requirements in order for BIG-IP GTM synchronization group members to communicate and synchronize properly. For more information, refer to SOL13734: BIG-IP GTM synchronization group requirements.
Starting in version 11.x, the BIG-IP GTM system uses a commit_id structure, which is linked to an MCP transaction, as a timestamp when updating the configuration for a given device group. The BIG-IP GTM sync group communication flow works as follows:
- The Configuration utility or the tmsh utility communicates
configuration change to the mcpd process.
- The mcpd process forwards the new configuration in its entirety to the local gtmd process.
- The gtmd process updates the commit_id value and
writes the new configuration to the /config/bigip_gtm.conf file.
- The local big3d process begins advertising the updated
commit_id value using heartbeat messages transmitted to all remote gtmd
processes.
- When a remote gtmd process notices that the peer BIG-IP GTM
has a newer commit_id value, the remote gtmd invokes the
iqsyncer utility to pull the newer configuration.
- The iqsyncer utility connects to the big3d process of
the BIG-IP GTM system with the newer commit_id and requests the
full configuration.
- The big3d process connects to its mcpd process and
requests the full configuration.
- The mcpd process passes the configuration back to the big3d process
in one or more messages. The big3d process then transmits those
messages back to the requesting iqsyncer utility, and iqsyncer
passes the new configuration directly to its own mcpd process,
which loads it into memory.
- Once the mcpd process receives the new configuration, it
passes the configuration to its own gtmd process, which updates
its timestamp with the commit_id of the source BIG-IP GTM, and
writes the configuration to the /config/bigip_gtm.conf file.
Symptoms
As a result of synchronization and iquery connection issues, you may encounter the following symptoms:
- BIG-IP GTM synchronization group members may have configuration
discrepancies
- Server objects are marked as Unavailable (Red) or Unknown (Blue)
- Log messages report issues related to synchronization and iQuery connections
Wednesday, January 30, 2013
Checking monitor page
========
CURL
========
We can try testing an HTTP pool member using curl, netcat or other tools like telnet. Let's try curl as it forms a majority of the request for us. The -v flag
curl -v http://10.41.0.21:80/monitor_page.html
curl -kv http://10.41.0.21:80/monitor_page.html
- -v - print verbose output (includes request and response HTTP headers)
For HTTPS servers, add the -k flag to ignore cert validation errors
=========================================
If you didn't save the file in pcap by -w pcap than u can save it by editcap -F
=============================================
=============================================
Also if its https then its better to login into pool member/generic host via openssl and then entering monitor.
openssl s_client -connect 171.182.199.19:4025
==============================================
==============================================
=======
TCPDUMP
=======
https://devcentral.f5.com/wiki/advdesignconfig.troubleshootingltmmonitors.ashx
We can use tcpdump to see what response is being sent and received to and from the pool member. We use some specific flags to configure the output:
- -nn - don't attempt to convert IP addresses to hostnames or ports to service names
- -X - print hex and ascii output
- -s0 - don't limit the snap length (packet size) captured
tcpdump -nni 0.0 -X -s0 host 10.41.0.21 and port 80 and host 10.41.1.3 -w test.pcap
To filter the traffic, we use the pool member IP address, port and the non-floating self IP that the monitor requests will be sent from.
===================================================================
If you want to know something more about editcap go to link below.
http://www.softpanorama.org/Net/Netutils/Sniffers/editcap.shtml#F_flag
Introduction
editcap [ -c <packets per file> ] [ -C <choplen> ] [ -E <error probability> ] [ -F <file format> ] [ -A <start time> ] [ -B <stop time> ] [ -h ] [ -r ] [ -s <snaplen> ] [ -t <time adjustment> ] [ -T <encapsulation type> ] [ -v ] infile outfile [ packet#[-packet#] ... ]
Editcap is a filter that reads some or all of the captured packets from the infile, optionally converts them in various ways and writes the resulting packets to the capture outfile (or outfiles).
By default, it reads all packets from the infile and writes them to the outfile in libpcap file format.
A list of packet numbers can be specified on the command line; ranges of packet numbers can be specified as start-end, referring to all packets from start to end. The selected packets with those numbers will not be written to the capture file. If the -r flag is specified, the whole packet selection is reversed; in that case only the selected packets will be written to the capture file.
Editcap is able to detect, read and write the same capture files that are supported by Ethereal. The input file doesn't need a specific filename extension, the file format and an optional gzip compression will be automatically detected. The capture file format section of ethereal(1) or http://www.ethereal.com/docs/man-pages/ethereal.1.html provides a detailed description.
Editcap can write the file in several output formats. The -F flag can be used to specify the format in which to write the capture file, editcap -F provides a list of the available output formats.
OPTIONS
-c <packets per file>
Sets the maximum number of packets per output file. Each output file will be created with a suffix -nnnnn, starting with 00000. If the specified number of packets are written to the output file, the next output file is opened. The default is to use a single output file.
-C <choplen>
Sets the chop length to use when writing the packet data. Each packet is chopped at the packet end by a few <choplen> bytes of data.
This is useful in the rare case that the conversion between two file formats leaves some random bytes at the end of each packet.
-E <error probability>
Sets the probabilty that bytes in the output file are randomly changed. Editcap uses that probability (between 0.0 and 1.0 inclusive) to apply errors to each data byte in the file. For instance, a probability of 0.02 means that each byte has a 2% chance of having an error.
This option is meant to be used for fuzz-testing protocol dissectors.
-F <file format>
Sets the file format of the output capture file. Editcap can write the file in several formats, editcap -F provides a list of the available output formats. The default is the libpcap format.
-A <start time>
Saves only the packets whose timestamp is on or after start time. The time is given in the following format YYYY-MM-DD HH:MM:SS
-B <stop time>
Saves only the packets whose timestamp is on or before stop time. The time is given in the following format YYYY-MM-DD HH:MM:SS
-h
Prints the version and options and exits.
-r
Reverse the packet selection. Causes the packets whose packet numbers are specified on the command line to be written to the output capture file, instead of discarding them.
-s <snaplen>
Sets the snapshot length to use when writing the data. If the -s flag is used to specify a snapshot length, packets in the input file with more captured data than the specified snapshot length will have only the amount of data specified by the snapshot length written to the output file.
This may be useful if the program that is to read the output file cannot handle packets larger than a certain size (for example, the versions of snoop in Solaris 2.5.1 and Solaris 2.6 appear to reject Ethernet packets larger than the standard Ethernet MTU, making them incapable of handling gigabit Ethernet captures if jumbo packets were used).
-t <time adjustment>
Sets the time adjustment to use on selected packets. If the -t flag is used to specify a time adjustment, the specified adjustment will be applied to all selected packets in the capture file. The adjustment is specified as [-]seconds[.fractional seconds]. For example, -t 3600 advances the timestamp on selected packets by one hour while -t -0.5 reduces the timestamp on selected packets by one-half second.
This feature is useful when synchronizing dumps collected on different machines where the time difference between the two machines is known or can be estimated.
-T <encapsulation type>
Sets the packet encapsulation type of the output capture file. If the -T flag is used to specify an encapsulation type, the encapsulation type of the output capture file will be forced to the specified type. editcap -T provides a list of the available types. The default type is the one appropriate to the encapsulation type of the input capture file.
Note: this merely forces the encapsulation type of the output file to be the specified type; the packet headers of the packets will not be translated from the encapsulation type of the input capture file to the specified encapsulation type (for example, it will not translate an Ethernet capture to an FDDI capture if an Ethernet capture is read and '-T fddi' is specified).
-v
Causes editcap to print verbose messages while it's working.
Examples
To see more detailed description of the options use:
editcap -h
To shrink the capture file by truncating the packets at 64 bytes and writing it as Sun snoop file use:
editcap -s 64 -F snoop capture.pcap shortcapture.snoop
To delete packet 1000 from the capture file use:
editcap capture.pcap sans1000.pcap 1000
To limit a capture file to packets from number 200 to 750 (inclusive) use:
editcap -r capture.pcap small.pcap 200-750
To get all packets from number 1-500 (inclusive) use:
editcap -r capture.pcap 500.pcap 1-500
or
editcap capture.pcap 500.pcap 501-9999999
To filter out packets 10 to 20 and 30 to 40 into a new file use:
editcap capture.pcap selection.pcap 10-20 30-40
To introduce 5% random errors in a capture file use:
editcap -E 0.05 capture.pcap capture_error.pcap
Subscribe to:
Posts (Atom)
Comments
F5
BIG IP VE user Guide
Thanks for the user guide. i wonder if you have kind of link or document for such guide for someone like me who just started to learn F5. I have done my Sale and Technical Sales Accreditation on BIG IP F5 and installed BIG IP VE. But i am kind of lost where to start from. I appreciate your assistance,
Cheers
Mas
RE: User Guide
iRules rock
Pound
Pound == OpenSSL
I'm trying to measure the actual difference between the physical hardware and OpenSSL (through nginx) but good benchmarks are proving tricky. I'll link to the results in the article if I can produce something reputable.
X-Forwarded-Proto
http://drupal.org/node/313145
http://en.wikipedia.org/wiki/List_of_HTTP_header_fields
Good stuff, thanks.
Updated
Awesome
A few comments:
1) I realize you already changed the X-Forwarded-For header, but I wanted to point out a few things.
a) Instead of using the iRule, you can use the HTTP Profile. Profiles are way to apply settings that have been "productized". They are faster, and less error prone (through forgetting the iRule or having a typo, etc). So I would recommend going to Local Traffic-->Profiles--> Then creating a new HTTP profile based on HTTP and ENABLE "Insert X-Forwarded-For". Whether you use this header or the X-Forwarded-Proto doesn't really matter internally, you're just trying to preserve the IP address in a NAT/SNAT environment.
b) Now that you have the HTTP profile created, apply it to your virtual server and remove the iRule. You will increase your performance!
c) Another thing the HTTP profile does is a feature called "Redirect Rewrite". In many cases when you're doing this type of load balancing, redirect responses may have the SERVERs hostname instead of the Virtual IP Addresses' hostname, Redirect Rewrite fixes this for you, and all you have to do is Enable it using option like "All" or "Matching"
In any case, I highly recommend the HTTP profile, just don't forget to apply it and remove the iRule!
2) Another optimization besides SSL offload that the BIG-IP can provide is TCP optimization. We see tremendous gains just by turning on these optimizations if you have users coming from various locations on the Internet. The BIG-IP can independently manage window size scaling for each connection, speeding traffic and offloading processing for your servers. Within the Local Traffic--->Virtual Servers, simply change your "Protocol Profile (Client)" to tcp-wan-optimized and your Protocol Profile (Server) to tcp-lan-optimized . You can also clone these profiles and make other changes if you feel comfortable doing that, but for most uses, simply applying the WAN optimized settings will lead some good results for your visitors.
3) Yet another optimization is compression. Depending on the model of BIG-IP you are on, it may have hardware compression. In either case, you can still offload the gzip compression for your servers to the BIG-IP. This is yet another profile that you can just apply.
4) And finally, there are two other optimizations that can lead some amazing results for your servers:
a) First, OneConnect. This profile multiplexes connections back to the servers. BIG-IP is able to simultaneously put multiple HTTP requests through each TCP connection, significantly reducing the CPU on the OS. This works great for most applications, but there are some systems where it is problematic. However, I'm pretty sure Drupal will have no issues with this given the nature of the HTTP traffic there.
b) Second, RamCache or in V11, Web Acceleration. By applying the RamCache (V9 and V10) or Web Acceleration profiles (V11) you can serve up cacheable content right from BIG-IPs memory. Another great way to speed up performance. BIG-IP does have a WebAccelerator module which is a more intelligent and full featured object cache, but the default RamCache or Web Acceleration profiles come with the base license.
I hope this is helpful to all. Any questions, let me know!
Did it go any faster?
Did you experiment with purchasing a (much cheaper) encryption offload pci card for your Apache server?
On !== on
Doesn't play nicely with secure_pages module, which checks for 'on'.
More benchmarks, please
Even better, it would be interesting to see a test with a tool that handled HTTP 1.1 and keep-alive, which is often used in conjunction with SSL in order to improve performance and decrease latency. ab speaks HTTP 1.0 and some servers don't honor its request for keep-alive.
Agreed
So as of right now I haven't found a good way to compare OpenSSL (software) versus the F5 (hardware). I also agree that using persistent connections would speed up the process quite a bit, but that may end up muddying the results more than helping, since then other factors start coming more into play as the bottleneck and you may end up accidentally measuring something else like network latency or web server performance.